If this looks a bit familiar you are not wrong: this is a tutorial to make a story book like this one here. The workshop during the Etsy Craft Party was a success and I was simply amazed by all the little variations in outcomes and creative uses of material provided. That’s the best part of this technique: it’s simple, but very versatile.
To start you will need the following items:

– One big piece of paper to fold into a story book. Magazine pages work the best because they are quite thin and fold very well. Plus you are bound to find a nice colourful and interesting looking page to use. You can download a free folding guide here.
– Washi tape for decoration and seal off the edges so that they look nice and straight. I simply adore washi tape and it’s become more and more common to find in ordinary shops. There’s also a brilliant selection available on Etsy.
– For the story itself I use pages from old books that have fallen apart. You can also just skim a magazine to find the words you need. However, book pages do give a nice atmosphere to a story book. If you don’t have any ready you can order a packet of 20 pages with a variety of colour, typefaces and languages on Foregone Finds.
– Glue for sticking all the interesting bits and pieces into your book.
– Scissors or an x-acto knife for cutting all the interesting bits and pieces out.
– Optional: a pencil to press and slide over all the folding lines so that they are extra sharp and neat.
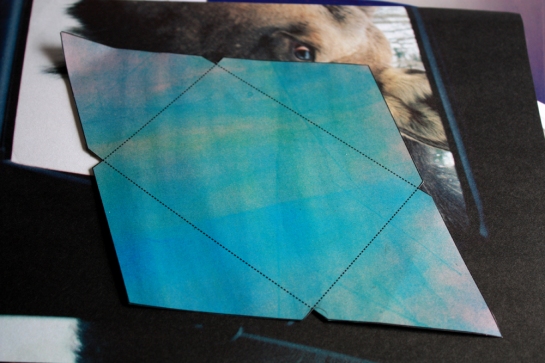
– Also optional is a piece of sturdy paper to cut a nice envelope packaging from. You could also print out a nice image on sturdy matte photo stock to use if you can’t find anything else. I have uploaded a free template to use here. This envelope is for (gift) packaging only as it is too small according to post regulations!
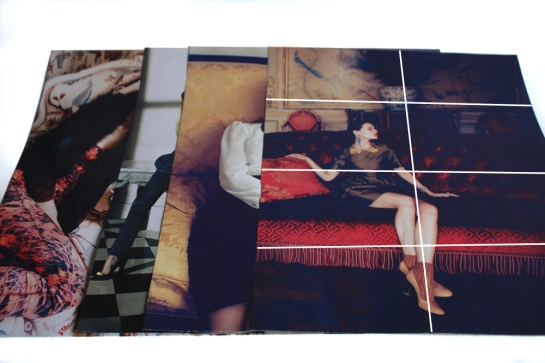
Now the most important part is picking out a nice piece of paper to fold into a booklet. Like I said, magazines are perfect for the task. Just keep in mind that you’re going to fold it into eight pages (counting both sides) and every page should have something interesting on it for your background. In the image above I’ve drawn a rough guide to keep in mind how your pages are going to look like.
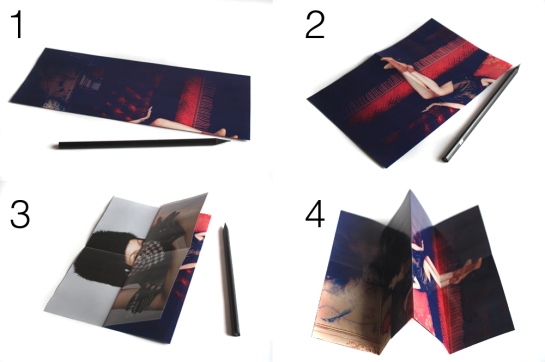
Once you’ve picked your paper it’s time to fold. Keep in mind that for step 1 and 2 the side you want to use needs to be visible from the outside when you fold.
1. First you fold it lengthwise. Use the pencil to press and slide over the fold to accentuate the fold.
2. Open your paper and now fold it crosswise.
3. Keep your paper closed and fold each end towards the centre to make a sort of a harmonica.
4. If you open up the paper again it should look like this.
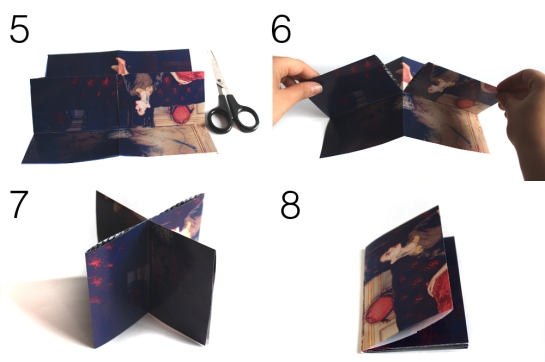
5. Cut alongside the first fold from step 1 until you reach the crosswise fold from step 3.
6. This should show how far you should cut. Now hold the paper on both ends of the cut and carefully pull it open…
7. Until it looks like this. You have now basically made your own booklet and the possibilities are endless.
8. Look through your booklet to decide what the cover should be. The orientation of your story book could be both portrait or landscape, so you can weigh that into your decision.
The first thing you’ll notice is that the edges won’t align. That’s okay! It’s pretty impossible for it to do so no matter how careful you are because paper always has a thickness. I go around this problem by taping up the edges with washi tape.

9. You can tape up as many edges as you want. Personally I like to mainly tape up the cover and leave the inner pages be.
10. You can use the same colour tape for your project or mix it up. If you mix it up it might be fun to carefully make a cross cut with an x-acto knife where the two tapes meet so that the transition between two tapes looks more smooth.
11. And you’re done! Once you’ve taped the edges it won’t be possible to choose a new cover, so choose wisely the first time.
12. You can now trace the envelope template over the paper you want to use for packaging and cut it out. The thicker paper will be harder to fold so you might want to go over the inside of the fold very lightly with a scissor or a bit harder with a pencil. You can use glue or washi tape to close the envelope.
Now that you’re done it’s time to decorate the inside. I can’t really tell you how to do that; it’s up to you and your imagination! But if you need some help here’s an example:
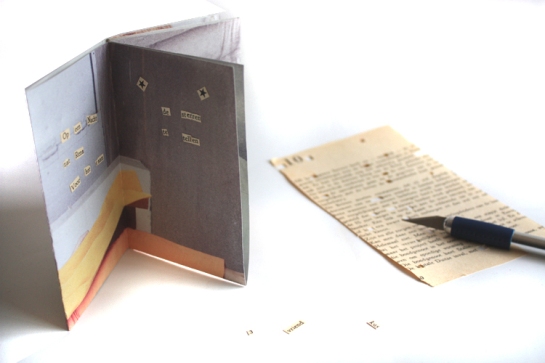
As you can see I’ve kept the text quite minimal. I made up a short story myself and then went on to look for the words in the book pages. You will find that it is extremely hard to find the exact words, so it might be best to look for parts of words or even individual letters. If you’re consistent in the pages you use it won’t look too much like a ransom letter! For the story book above I only used two pages. It’s best to keep it short and simple or you’ll be browsing for the right word for a week!
The story is (with bookpages mentioned):
1. Op een nacht zat Rena voor het raam 2. de sterren te tellen. 3. Toen ze bij 70 was 4. viel er een ster uit de hemel. 5. Ze wenste om een vriend 6. en kreeg een schat.
Translation:
On one night Rena was sitting in front of the window counting the stars. When she reached 70 a star fell down from the heaven. She wished for a friend and received a treasure.
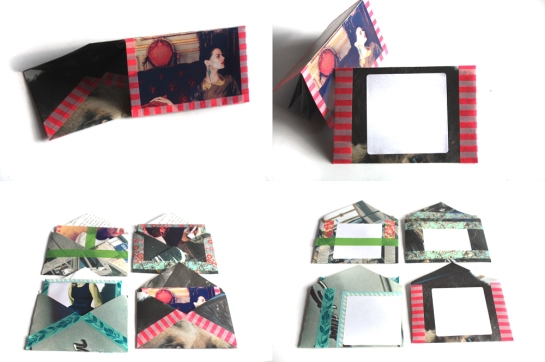 And this is basically it! Above are some more examples and variations of how it can look. I like to stick a white square on the back to write the name of the recipient or add a small message. You can buy all of these booklets in a story book kit that comes with loads of recycled material to decorate them with in Foregone Finds. Each kit contains a booklet and envelope packaging, 2 book pages in English and 2 book pages in a different language, various interesting bits and pieces to decorate and a piece of matching washi tape to close the envelope. These kits are like the minimal effort for great results!
If you finish your story book I would love to see the results!